The flank steak is very flavourful and can be quite tender if prepared and cooked properly. It also has the benefit of being about half the price of a New York strip. The flank steak should be marinated to break down the connective tissue. By using a vacuum container, you can significantly reduce the marinating time and generate great flavour. Creating a vacuum opens the pores of the meat and allows the Korean style marinade in this recipe to penetrate the meat more deeply and quickly, while the acid from the vinegars tenderizes the meat.
The Ingredients: Korean Style Marinated Flank Steak
Serves 2-3 people, prep time 5 minutes, marinade time 2-4 hours, cook time 7 minutes, rest time 5 minutesMarinade:
½ cup soy sauce
¼ cup mirin
¼ cup roasted sesame seed oil
2 tbsp brown sugar
2 medium sized cloves of garlic minced
3 tbsp fresh ginger finely chopped
½ tsp of crushed chili flakes
1½ lbs of flank steak
1 tsp of fine sea salt
1 tsp of fresh ground pepper
Combine the brown sugar, garlic, ginger and chili flakes in a bowl. Rub the mixture into flank steak.
Place the steak in a vacuum container.
Pour the soy sauce, mirin and roasted sesame seed oil over the steak. If the steak is not completely covered by the marinade you can add more liquid in the same ratio.
Pump the air out of the vacuum container and place it in the fridge for one to three hours. Remove the steak from the fridge one hour before you are ready to cook. The steak should be grilled at room temperature to ensure it’s evenly cooked and tender.
Ten minutes before cooking, remove the steak from the marinade and sprinkle sea salt and pepper on both sides.
BBQ Method:
Turn on your BBQ to high heat, close the lid and allow it to heat up. The BBQ should be 500-600 degrees before grilling the steak.
 Place the steak over the flame, close the lid and do not touch.
After 3 1/2 minutes flip the steak and close the lid once again.
Wait another 3 ½ minutes and remove the steak from the BBQ. It is not recommended to cook flank steak much more than medium-rare or it will become tough and chewy.
Place the steak on a plate, cover loosely with aluminum foil and let rest for 5 minutes.
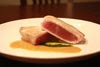
When slicing a flank steak always cut thin slices on a diagonal against the grain to ensure tender bites. Serve with rice and salad, and enjoy!
Stove Method:
Turn on the oven broiler to 500 degrees (or high). Heat a large oven safe pan over the stove top on high heat for about 5 minutes (the pan should be as hot as it can get).
When you place the steak in the pan it should sear immediately (make sure you have the exhaust fan on as it will probably smoke).
After 30 seconds, flip the steak and sear for another 30 seconds.
Place the pan in the oven directly under the broiler for 3 minutes.
Remove the pan, flip the steak and return the steak to the oven for another 3 minutes. It is not recommended to cook flank steak much more than medium-rare or it will become tough and chewy.
Place the steak on a plate and cover loosely with aluminum foil for 5 minutes.
When slicing a flank steak always cut thin slices on a diagonal against the grain to ensure tender bites. Serve with rice, salad and enjoy!
Click Here to Read More..