Saturday, August 22, 2009

Recipe: Beef Bourguignon Inspired Turkey Stew

Beef Bourguignon Inspired Turkey StewI wouldn't say it was cold here today, but it is rainy and that is a good enough reason to make some comfort food on a Saturday night. My wife and kids continually challenge me to come up with ways to cook my traditional favorites without the beef. Like most red blooded men, I wouldn't believe that there is any replacement for beef especially when making beef bourguignon (duh its got the word beef in it). That being said, if you cook this for your family I would guess no ones notices that it is not beef. The meat falls apart, but maintains its moisture and the sauce has such depth of flavour you have to serve it with potatoes and bread to sop it all up! All this being said, replace the Turkey and chicken stock with Beef and you have an amazing meal as well.

Cooking the turkey
The Recipe: Beef Bourguignon Inspired Turkey Stew

3 lbs Cube Turkey Thighs (3/4 inch)
1/4 cup flour
1 tbsp paprika
1 tbsp chili powder
1 tsp cayenne
3 tsp sea salt
1 tbsp butter
1 tbsp of oil
1 cup of diced shallots
4-6 cloves of garlic minced
2 cups of diced tomatoes (I use fresh)
1 tbsp Worcestershire sauce
1 cup of red wine (medium to full body)
1/2 cup of chicken stock

20 small button mushrooms sauteed separately
pinch of sea salt
pinch of fresh group pepper
1 tbsp butter

Mix 1 tsp salt, flour, cayenne, paprika and chili powder together and cover cubed turkey thighs. Use your hands to work the rub onto the cubes. Heat a pot over high heat until up to temperature and add the butter and olive oil (the olive oil will increase the burning point of the butter so that it can withstand the higher heat). Place the cubes in the pan one at a time and ensure that you hear a sizzle when you are placing the cubes in the pot. Make sure all the pieces are touching the bottom of the pot (I assume you do not have a large enough pot to put all the turkey in the same batch, hence you will need to repeat these steps with a second batch). Sear each side for about 1 minute each until a nice crust appears. Once the meat is seared on each side remove it from the pan and set it aside.

In the same hot pan, add you shallots and stir for about 4 minutes. Turn down the heat or add some more oil if you are worried about burning the shallots (you can add any juices that has settled off the turkey that has been set aside back to the pot to help saute the shallots). Add the the garlic on top of the shallots and continue stirring for another minute (if the garlic hits the pot directly they may burn, hence it is best to temper them in). Add the diced tomatoes and Worcestershire sauce and continue cooking for about 3-5 minutes, stirring consistently, until your tomatoes have lost there shape. Letting the stew simmerAdd the red wine and continue cooking for another 2 minutes, ensuring you are back up to a boil. Add the stock and bring back up to a boil, cooking the liquid for about 2 minutes. Add the turkey thighs back in and reduce heat to medium-low. Let the stew simmer for about 1 hour, partially covered, stirring occasionally.

The sauce should thicken up from the flour that was used to dredge the turkey. Saute the mushrooms separately in a pan and add the to the stew at the end. Serve with bread and potatoes so everyone can sop up all the juices!
Click Here to Read More..

Friday, August 21, 2009

Recipe: Pounded Turkey Breast with Basil, Sundried Tomato and Balsamic Rub

Turkey Breast with Basil, Sundried Tomato and Balsamic Rub We have been dabbling in an organic veggie and herb garden this year, but with the start of the summer being so wet and and cool I didn't seem to get much growth and had partially written the garden off. Otherwise known as let the bunnies eat what they want and if it grows great!

To my surprise when I went to check out the garden today there was some beautiful basil growing! Not huge and I should probably let it grow before harvesting (can I use that term with three small plants?), but hey it is friday night, lets go crazy! Turkey Breast was on the menu, but instead of one of my go to dried rub mixes I thought I would use some basil and keep it relatively simple with sundried tomatoes and balsamic.

Fresh Basil, Sundried Tomato & Balsamic Rub
The Recipe: Turkey Breast with Basil, Sundried Tomato and Balsamic Rub

1 1/2 lbs of turkey breast flatten
Handful of fresh Basil
4 Sundried tomatoes
1 tbsp Balsamic
1 tsp sea salt
10 peppercorns
2 tbsp extra virgin olive oil

Cut turkey into 4 equal pieces and pound with a meat tenderizer until about a 1/4 inch thick. Then combine the remaining ingredients in a mortar and pestle and grind to a paste (you could probably use a small food processor as well). Rub the paste on both sides of all the pieces and let sit for about 20 minutes. Heat one side of your BBQ until the internal temperature is over 400F and preferably between 500F and 600F. Place the turkey on the side that does not have the flame (indirect heat method). Flip the turkey after 5-8 minutes depending on the heat of the BBQ. Make sure you move the pieces around if you have some closer to the flame side or the BBQ has some hot spots. Check to see if the meat is ready after 8-10 minutes by taking a small slice into the side. The meat should be white throughout. Try not to over cook as the more juice left in the turkey, the better the flavour. I added some sauteed mushrooms for a little extra flavour as well!
Click Here to Read More..

Recipe: The Perfect Over Easy Egg

The perfect egg, although it seems simple and has been done for centuries, is actually not as easy as it sounds. I have been practising a lot recently since my one year old is in love with egg yolks (still to early to give him the whites). So the challenge is to create the perfect dipper / over easy egg where we can scoop the yolk out with a spoon. Some would do this using a soft boiled egg, but why take 10-15minutes when you can do it in two.

One more caveat is that I don't use non-stick frying pans for health reasons (if food doesn't stick to them, how does the coating stick to the pan?), hence a beautifully seasoned cast iron pan is the way to go for me.

A few keys to remember:
1. Make sure you have enough oil (I use butter for the flavour).
2. Use a bigger pan than you need (this helps with flipping).
3. Do not fill the pan with eggs, this makes flipping much more challenging.
4. The pan should not be too hot, I like to use butter for this reason as well. If the butter browns when it hits the pan, the pan is too hot!
5. Crack the egg on a counter or flat surface, not a corner or edge as this helps prevent broken shells in your eggs.
6. Get a good flipper. This can make all the difference. It should be medium width and longer with no curved edges. I have five flippers, but only one is good enough for eggs!

Now that you are ready, lets get cracking (sorry:)). Heat a pan to medium-low heat, add butter (or oil) and let melt. Use your flipper to spread the butter around the pan so it is covered. Once melted, add the egg (don't get fancy, use 2 hands, this is all about preserving the yolk) to the center of the pan and don't touch it. The edges should start to turn white on the bottom immediately but the rest of the egg should slowly turn white. After about 1 minute, the edges of the whites should be fully cooked and the middle around the yolk should start be firm on the bottom. Some of the white will still be uncooked on the top and around the yolk. Let's get ready to flip, but don't just jump in, there is a chance part of the egg is a little stuck to the pan and this can spell disaster for our sensitive little yolk. Work your flipper around the egg until it moves freely on the pan. Now we are ready to flip, good luck! Try to ensure none of the egg folds under itself or you will end up with the dreaded uncooked whites (yuck). Cook for another 10-20 seconds, remove, season with sea salt and fresh ground pepper to taste. Enjoy with your favourite piece of toast!
Click Here to Read More..

Wednesday, August 19, 2009

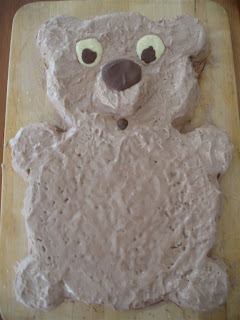
Recipe: The Teddy Bear Cake - Birthday Cake Take 2

My sons birthdays are 2 weeks apart and that means I had a chance to redeem myself for the design of the rocket ship cake. My youngest, Jack, is turning one tomorrow, hence the afternoon was spent baking and decorating a cake. After the 3-D rocket ship I thought I would try something a little more "down to earth" and easier to pull off. I have to say that my second attempt at baking a birthday cake turned out much cuter than the first and the taste (the part that really matters) is just as good.

Basic Vanilla Sponge Cake BatterI used Jacques Pepin's recipe for a basic sponge cake since it came out so beautifully on the rocket ship cake, except this time it will be vanilla and not chocolate. It is a simple recipe containing only 6 eggs, 1/2 cup of sugar, 1/3 tsp of vanilla, 1 cup of flour and 6 tbsp of butter, but it takes a little bit of work and time to get the eggs, sugar and vanilla "as thick as a ribbon". It is well worth the effort however because Light, moist vanilla cakethe result is great! With some planning and a pow wow with my wife and sister, we decided to do one large round cake for the body, a slightly smaller cake for the head and seven smaller cakes, cooked in ramekins, for the feet, ears and nose.

For the frosting I wanted to use a chocolate butter cream, although me and chocolate have a love hate relationship (If it is too rich I get a headache), thus I wanted to keep it on the light side and not too rich in chocolate. I started with a Betty Crocker chocolate buttercream recipe, but based on the results from the rocket ship cake, I thought I would change things up a bit. What turned out was a beautifully smooth icing that light and not too sweet.

Milk Chocolate Buttercream Icing Recipe: Milk Chocolate Buttercream Icing

1 1/3 cup of sweet butter cubed at room temperature
100 grams of melted milk chocolate (I use green and blacks organic)
1 1/2 tbsp of cream cheese
1 tsp vanilla
1 pinch of salt
2 cups of icing sugar
2-3 tbsp of milk

Start by heating the chocolate over a double boiler until just melted, set aside for 5 minutes. Add butter to a bowl and whip with a hand beater or mixer (I used a hand beater) on high for about 1-2 minutes. Add melted chocolate, cream cheese, vanilla and salt and continue to beat for another 1-2 minutes. The objective to ensure everything if very well incorporate and we try to get some air in the mixture. As you whip the mixture more the chocolate will become lighter in colour. Ad the icing sugar 1/2 cup a time, continuing to mix for about 30 seconds before adding another 1/2 cup. At the end, add in the milk one tbsp at time until you achieve the consistency to desire/require to spread on the cake.

Cakes completed, now for some icing...Once the cakes were cooled down I simply layered on the icing with a spatula and gently spread it around. To try and achieve a bit of fur-like texture, I scrunched up a paper towel and gentle dabbed the icing until I got small peaks. The eyes, nose and mouth were done by melting and cooling some white chocolate and milk chocolate into shape on parchment paper.

Thankfully there were a few trimmings left over from putting the circles together hence we were able to sample the cake early! The result is not only a cute cake but also a wonderfully light (not diet light) and delectable cake. Now we just have to decide if Jack is allowed to have any!

The Teddy Bear Cake!

Click Here to Read More..

Tuesday, August 18, 2009

How to Breakdown a Chicken

So there are rumours out there that the economy is not as good as it once was. In that breath, one way to save a little money is to do a little work yourself, hence I put together a quick video on how to butcher a chicken.
I am self taught and it seems to work, so if you have a better method please let me know. The other great thing about butchering a chicken yourself is the amount of options you have and the different palates you can please. With any meat, keeping the bones on while cooking also adds some flavour and helps keep the bird succulent! Good luck and have fun chopping!

Click Here to Read More..

Sunday, August 16, 2009

Video Recipe: Chicken, Proscuitto and Mushroom Risotto

I love making different versions of risotto based on whatever gourmet ingredients are in the house. This week it was organic prosciutto! Enjoy
Recipe: Risotto with Chicken, Mushrooms and Procuitto
1 cup aborio rice
1 1/2 pounds of cubed chicken (approx 1/2 to 1/4 inch)
3-4 cups chicken stock
1/4 cup of white wine (I use Riesling)
10 crimini mushrooms sliced
2 tbsp olive oil
1 tsp sea salt plus a pinch
pinch of pepper
1 tbsp paprika
2 small tomatoes
1/4 cup of fresh parsley finely chopped
1/4 parmesan
5 cloves of Garlic
1 large onion
5 tbsp of Butter
75 grams or 1/5 pound of prosciutto

Combine onions, garlic and 4 tbsp of butter in a small saucepan and place over medium heat until butter is melted, turn to medium-low heat and let simmer for about 30-45 minutes. Once completed strain through a sieve and set aside. Melt one tbsp of butter in a pan and add mushrooms, salt and pepper. Cook over medium-high heat until liquid has been reduced, set aside once finished. In a medium saucepan heat the chicken stock over med-low heat, start the stock about five minutes before you start the risotto pan.

Chicken, Proscuitto and Mushroom RisottoTo cook the risotto, heat a large pan over high heat. Once hot add the olive oil and the chicken, stir the chicken to sear all sides. While searing add the paprika. After about 1 minute add the rice and continue to stir, ensuring that you coat the rice in paprika and oil. Add the tomatoes, salt and let cook for about 1-2 minutes stirring consistently. Add the wine and stir to remove any bits that have stuck to the pan. The wine should boil immediately, after about 1 minute you can start to add chicken stock a few ladles at a time. Continue stirring frequently. As the liquid reduces and the rice starts to stick to the pan add more stock, a couple ladles at a time. After about 10 minutes and once the rice has significant increased in size, taste a few pieces of rice for doneness. The rice should be soft but maintain a little bite, thus a little el dente. Once the rice has reach this point you can add the parsley, prosciutto, mushrooms and strained butter. Remove from heat and stir in the parmesan. Congratulations on a beautiful risotto!

Risotto on Foodista
Click Here to Read More..