 Back to school season is quickly rushing upon us, although my kids are not of the age yet so we actually enjoy when all those little twerps (I mean sweethearts) head back to school so that we can go camping and take hikes in peace. However I can definitely sympathize with families trying to get back into the swing of fall. Growing up, back to school coincided with hockey tryouts and dance season (for my sister), hence our house was even more chaotic than normal. This makes it even more important to plan meals ahead but also to make something that the family enjoys and is healthy. By making your own chicken fingers, you are able to control the quality and amount of chicken in each piece. I think the beauty of chicken fingers and the reason kids love them so much is that they are excellent for locking in the juices of the chicken and stopping the meat from drying out. I think kids are very smart about what they eat and we can probably learn a lot about our diets based on their likes and dislikes (keeping in mind we need different things at different points in our lives).
The Recipe: Chicken Fingers
3 large chicken breast cut into strips
1 egg beaten
Olive Oil Breading
(you can make a large batch of the breading and keep it in the freezer for quicker future preps)
1 cup of bread crumbs (I use leftover french loaf but make sure not to put it in a plastic bag as this traps the moisture and causes mold. Store in a paper bag so the bread will completely dry out after about 1-2 weeks and the food processor does the rest)
1/4 cup of Parmesan
2 tsp of sea salt
1 tbsp cumin
1 tbsp chili powder
pinch of cayenne (to pop the flavours, not for heat)
20 peppercorns
1 tbsp dried oregano
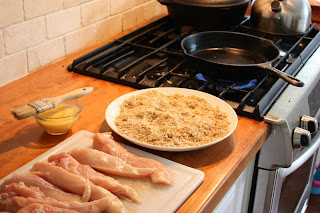
Mix all ingredients for the breading on a plate (I like to grind my spices in a mortar and pestle first to release the flavours). Heat your oven to 375 degrees. Heat a pan to med-high heat on the stove. Add about 2 tbsp of olive oil to the pan.  Use a small kitchen brush to paint the first strip of chicken with egg, then cover the chicken with breading mixture on the plate. Take the chicken directly from the plate to the pan on the stove. Repeat until your pan is full. Flip the chicken after about 1-2 minutes once the breading has turned a nice golden colour. Cook for another 1-2 minutes and place in a casserole dish. Continue to add new pieces of chicken to the pan until all the pieces are in the casserole dish. You may need to add more oil during the stove top process. Place the casserole dish in the oven and cook for about 20 minutes. Don't be afraid to cut a piece of chicken open to ensure it is done to your liking. If no juices are left in the chicken, you have cooked them too long! Serve with your favourite dipping sauce or a quick and dirty BBQ sauce if the fridge is empty.
Monday, August 24, 2009
Recipe: Chicken Fingers
Subscribe to:
Post Comments (Atom)


1 comment:
This is my son's favorite.SomeI'd love to guide our readers to your site if you won't mind.Just add your choice of foodista widget to this post and it's all set, Thanks!
Post a Comment