Friday, November 27, 2009

Roasted Garlic Gnocchi with White Wine Rose Sauce

fluffy roasted garlic gnocchiCreating beautiful pillow-like gnocchi is all about the correct tools and products. Using the right potatoes and flour is important to ensure you do not end up with a heavy gnocchi. Always use a good baking potato that turns light and dry when cooking. Equally important is using a potato ricer to mash the potatoes to ensure the potatoes are smooth and fluffy before making the dough.

The Recipe: Roasted Garlic Gnocchi with a White Wine Rose Sauce
Serves 4-6 as a side dish and 2-3 as a main course, prep time 1 1/2 hours (includes1 hour for baking the potatoes), cooking time 30 minutes

Gnocchi:
2 large Russet potatoes
1 cup of semolina flour
1 head of garlic
Drizzle of olive oil
Pinch of pepper
½ tsp sea salt plus 2 tbsp
½ an egg beaten

Sauce:
3 tbsp of butter
2 medium sized shallots diced
1 clove of garlic minced
½ cup of dry Riesling
2 tbsp tomato paste
¾ cup of 2% milk
Pinch of sea salt
2 tbsp fresh chopped basil
Parmesan cheese


roasted garlic gnocchi with rose sauceHeat the oven to 360 degrees.

Cut across the entire head of garlic so that all the tips are cut off, and place the garlic in the center of a six inch square piece of tin foil. Drizzle with olive oil, a pinch of sea salt and pepper. Fold the foil over top of the garlic to make a pouch.

Poke three sets of holes in each potato with a fork. Place the potatoes and garlic in the oven.

Remove the garlic after about 30 minutes and open the tin foil package to allow the garlic to cool.

Once the garlic has cooled, squeeze the soft cloves of garlic into a small bowl.

After one hour, check the potatoes with a fork to see if they are done. Continue cooking the potatoes until the insides are completely soft.

Using an oven mitt to hold the hot potato carefully cut the potato in half and scoop out the insides. Discard the potato skins and place the potato directly into a potato ricer with the roasted garlic.

Squeeze the potato and garlic through the ricer onto a clean surface. Spread the mixture out evenly into a thin layer allowing it to cool and also release some more moisture.

Once the potato mixture has cooled, add the egg and sprinkle evenly with the sea salt and about ¾ of the flour. Mix the dough only enough to ensure it is consistent throughout. Form the dough into a ball, adding more flour if necessary. The dough should be moist but not sticky. Over mixing will make the gnocchi thick and heavy.

Split the dough into six even pieces. With your hands roll the first piece of dough into a cylinder shape about the diameter of your thumb. With a straight edge, cut the pieces of gnocchi about ¾ of an inch to one inch pieces. Continue with this step until all six pieces are complete.

With the back of a fork, gently press each piece of gnocchi to create small ridges. This helps to sop up the sauce when eating.

Heat a large pot of water, with two tbsp of salt, to a rolling boil. Add the gnocchi and give a little stir to ensure that they do not stick together. When the pieces of gnocchi are ready, they will float to the surface. With a slotted spoon, remove the gnocchi and place in a colander until the sauce is ready.

To make the sauce, heat a large saucepan to medium-high heat. Add one tbsp of the butter, the sea salt and the shallots. Cook the shallots for about three minutes stirring frequently, and add the garlic. Continue cooking for another minute.

Add the wine and cook over high heat until almost all the liquid is evaporated.

Stir in the tomato paste until evenly incorporated.

Add the milk and bring the sauce to a boil while stirring.

Turn off the heat and stir in the remaining 2 tbsp of butter.

Add the gnocchi and basil to your serving bowl. Strain the sauce through a fine sieve into the bowl, removing the pieces shallot and garlic. Sprinkle with some freshly grated parmesan and enjoy!


Click Here to Read More..

Sunday, November 15, 2009

Turkey and Chicken Meatloaf

meatloafIf you read my blog often, you might be starting to see a trend with traditional ground beef dishes. Every week I purchases 1 1/2 pounds of dark ground turkey and dark ground chicken and out of these I make recipes like tacos, lasagne, hamburgers, meatballs etc... Because my wife cannot eat red meat and we do not introduce red meat to our children until the age of 2 I had to find a good substitute to make some of my favourite recipes. I only use dark meat because it has a lot more flavour and the white meat can dry out very easily. The end result is that most people do not even know it isn't beef. Anyways, this week we were having meatloaf. The key to a good meatloaf is taking some time up front to cook your vegetables to bring out the flavour before you add to the meatloaf!

The Recipe: Turkey and Chicken Meatloaf
Serves 4 with leftovers for lunch, prep time 40 minutes, Cook time 45 minutes.
1 1/2 pounds dark ground turkey
1 1/2 pounds dark ground chicken
1 egg
1 cup of bread crumbs
2 tsp sea salt
1 tsp fresh ground pepper
1 tbsp worchestershire sauce
1 tsp dried parsley
1 tsp dried basil
1 tsp dried oregano
3 ounces of old cheddar cheese cubed 1/4 inch
2 tbsp of tomato paste
1 medium sized onion diced
3 cloves of garlic minced
1 red pepper finely diced
8 medium sized button mushrooms finely chopped
1 tbsp olive oil
1 tbsp chili powder
1 tbsp paprika
Pinch of cayenne

Heat a skillet over med-high heat. When ready add the olive oil, onion and pepper. Cook for about 3 minutes stirring frequently.

Add the garlic and continue to cook and stir for another 2 minutes.

Add the cayenne, chili powder, paprika and cook for 1 minute stirring consistently to ensure you do not burn the spices.

Add the mushrooms and continue cooking until most of the moisture is out of the mushrooms (about 5 minutes). Set the pan off the heat.

Preheat your oven to 375 degrees.

In a large bowl combine the turkey, chicken, egg, bread crumbs, sea salt, ground pepper, worchestershire sauce, parsley, basil, oregano, old cheddar cheese, tomato paste and mix together with your hands.

Add the mixture from the skillet and mix with a spoon so that you do not burn yourself.

Place the mixture in a large casserole dish and form it into a loaf shape with your hands.

Place in the oven and cook for about 45 minutes. I recommend using a meat thermometer to determine when it is done as the size of the loaf will determine the cooking time. The loaf is ready when it is 177 degrees (if you cook it to the full 180 degrees it will continue cooking once removed and end up little dryer). Enjoy!

Click Here to Read More..

Sunday, November 8, 2009

Pan Seared Scallops

Pan Seared ScallopsScallops are a real treat when you can get them fresh and dry packed at your local fish monger. Even better, if you ever see them still in the shell you can't pass them up. Sea scallops packed in water or frozen lose a lot of their flavour and will be hard to cook and keep their shape. The greatest challenge with a beautiful sea scallop is not messing them up. Fresh out of the ocean they are a treat right out of the shell! Keeping it simple and cooking them right is the key. This recipe adds a little salt and tart flavour with the topping to play off the wonderful sweetness of the scallop!

The Recipe: Pan Seared Sea Scallops with a warm Parsley Lemon Butter
Serves 2, prep time 5 minutes, cook time 10 minutes.
8 fresh dry packed sea scallops
1 tbsp coconut oil
1 tbsp butter

Parsley Lemon Butter:
1 shallot finely diced
1 clove garlic finely minced
Rind of 1 lemon
Juice of one lemon
1/4 cup fresh chopped parsley
2 tbsp butter
Pinch of sea salt
Pinch of fresh ground pepper

In a small pan sauté the shallots and garlic in 1/2 tbsp of butter over medium heat for about 5 minutes, careful not to burn the shallots and garlic.

Add sea salt, pepper, lemon juice, lemon rind and continue reducing for another minute.

Remove from heat and stir in remaining butter until melted.

Add parsley and set aside in the pan.

Place the uncooked scallops on a folded paper towel to absorb any moisture they may have. The dryer the scallop the better it will sear.

Heat your heaviest skillet over high heat for about 5 minutes until very hot. The pan will probably start to smoke. Add the coconut oil then the butter, they will probably also start smoking immediately.

Add the scallops and sear for about 1 minute then flip. Sear for another minute and remove. The scallops should be slightly brown on each side.

Place the scallops on a paper towel before putting them on your plate (the paper towel will absorb any grease on them).

Top each scallop with a small amount of the parsley lemon butter and enjoy!


Related Recipes
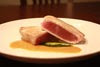
Seared TunaRecipe: Pan Seared Tuna
The key to tuna is cooking it properly, really hot and not too long! The roasted pepper sauce is a beautiful and simple addition to the tuna steak.
Recipe: Crusted Halibut with Basmati Rice
Halibut is beautiful white fish that tastes great and extremely healthy.


Click Here to Read More..

Friday, November 6, 2009

Pan Seared Tuna

Pan Seared TunaA nice tuna steak is a great change every once in a while. We eat fish normally once a week and stick to wild halibut or salmon (sometimes organic salmon as well), but the halibut and salmon did not look great this week. However I was happily surprised that my fish monger had some sushi grade tuna that did look great. Quality is very important with fish, especially tuna steaks, as the center will be raw once cooked (does that even make sense?:)). The key to tuna is cooking it properly, really hot and not too long! The roasted pepper sauce was a beautiful and simple addition to the tuna steak. I am sometimes limited by what I can find organically at the local markets, hence I made a yellow pepper sauce, but this would also be great with roasted red peppers.

The Recipe: Pan Seared Tuna with Roasted Pepper Sauce
2 servings, prep time 25 minutes, cook time 5 minutes

Tuna
2 pieces of sushi grade tuna about 1/2 pound each
1/2 tsp salt
1/2 tsp pepper
1 tbsp of extra virgin olive oil

Roasted Pepper Sauce:
1 shallot finely diced
1 clove of garlic minced
2 tbsps extra virgin olive oil
1 large red or yellow pepper (I used three small peppers)
2 tbsp chicken stock
pinch of sea salt
pinch of pepper

Parsley Drizzle:
1/4 cup of parsley
2 tbsp extra virgin olive oil

Roasted Pepper Sauce:
Roasting yellow peppersTo roast the peppers I place them directly over the flame on my stove top (I have a gas stove), although you can also use the broiler on the oven. The key to roasting the pepper is making sure that all the skin is black. Any skin that is not black will stick to the pepper when you are trying to peel it. You will need to rotate the pepper often while roasting.

Once the pepper is completely blackened, place it in a paper bag to steam for about 10 minutes.

Remove the pepper from the bag and gently scrape the blackened skin off with the edge of a knife. Remove the stem and seeds. Do not rinse the pepper under water as it removes a lot of flavour.

In a small pan add 1/2 tbsp of the olive oil and sauté the shallots and garlic over med-high heat for 5 minutes. Add the chicken stock, bring to a boil and transfer to a blender.

Add the remaining extra virgin olive oil, sea salt and pepper to the blender. Blend until smooth and remove from blender.

The Tuna:

Heat a cast iron skillet over high heat for about 5 minutes (do not use non-stick pan, it is a serious health hazard to heat a non-stick pan to high). The pan should be as hot as the stove can make it!

While the pan is heating, add salt and pepper to each side of the tuna and gently rub them in with olive oil.

Place the tuna in the pan and sear for about 1 minute, flip and continuing searing the tuna for another minute. Remove the tuna from the pan. Fire alarm alert, I suggest purchasing the kind that have the remote off buttons! The outside of the tuna should be completely seared and the middle should be raw.

Combine the parsley and olive oil in a mortar and pestle and grind until smooth. You can add a little coarse sea salt if you are having a challenge grinding the parsley.

I suggest placing the parsley drizzle and roasted pepper sauce beside the tuna on the plate so that you are able to get as much or little as you want with every bite. Enjoy!

Click Here to Read More..

Wednesday, November 4, 2009

Broken Down Roast Chicken

Broken Down Roast ChickenIf your family is anything like mine they love roast chicken, but you don't always have a couple hours to sit around and baste a chicken. Also, since my wife is a breast person and I am a leg man it is extra nice to be able to cook a whole chicken. The recipe also has the benefit of reserving the extra bones to make a great stock. On top of all this, it is a quick prep and wonderful juicy chicken, some even say they like it better than a full roast chicken. Here is a video showing how I break down my chicken.

Recipe: Broken Down Roast Chicken
Serves 4-6 (this recipes is easily scaled, I have used 2 lb and 7 lb chickens), prep time 10 minutes, cook time approx 45 minutes

1 6 lb Broken Down Chicken (bones on, 2 breast, 2 legs, 2 wings)
2 tbsp coconut oil
1 tbsp butter

The Rub:
1 tbsp chili powder
1 tbsp roasted paprika
1 tbsp paprika
1 tbsp cumin
2 tsp garlic powder
1 tsp dried oregano
1 tsp dried parsley
1 tsp dried basil
1 tbsp sea salt
1 tsp peppercorns

Preheat your oven to 400 degrees. After breaking down the chicken combine all the rub ingredients in a large mortar and pestle and grind until uniform. I understand that not everyone has a large mortar and pestle, my recommendation is buy one! Aside from that, make sure you grind the peppercorns and dried herbs before you mix them with the rest of the spices. The grinding helps release the flavours from the spices and herbs; hence it adds a little more flavour to the dish.

Liberally coat each piece of chicken on all sides with the rub and work it into the chicken. If you have extra rub save it for the next time you need a quick fix meal!

Heat your largest oven safe pan over high heat on the stove top. After the pan is up to temperature, add the oil and butter (the coconut oil will raise the burning point of the butter significantly).

Add each piece of chicken skin side down. The chicken should sizzle immediately if your pan is hot enough. Cook for 2 minutes then flip each piece of chicken. The breast may need to be turned a couple of times to sear all sides. The searing not only locks in the juices, but also will ensure crispy skin (my favourite part, the dog and I fight for my wife's skin)!

Once the skin side is up, place the entire pan in the oven. I suggest using a thermometer in the thickest part of the breast to determine cooking time. The chicken is ready when the breast temperature is between 175-180 degrees. I like to take my chicken out a little early and let it rest for a couple of minutes. This will ensure the temperature reaches the require 180 degrees but does not dry out.

A six pound chicken will take about 45 minutes to cook. If you do not have a thermometer, after about 40 minutes, you can take a little slice into the thickest part of the breast to make sure it is cooked through.
Click Here to Read More..

Monday, November 2, 2009

Fluffy Pumpkin Pie Recipe

Pumpkin PieI thought I would end pumpkin week with the most classic pumpkin recipe. Pumpkin pie! This pie recipe is an adaptation of Edna Staebler's fluffy pumpkin pie. I love the soft and smooth texture combined with the classic pumpkin flavours. This recipe will not disappoint! For the crust, I used Grandma's pie crust recipe.


The Recipe: Pumpkin Pie
Makes one 9" pie filling, prep time 15 minutes (provided you have the crust and pumpkin already prepared), cook time 45 minutes
3/4 cup milk
3 eggs, separated
2 cups roasted pumpkin puree
3/4 cup brown sugar
1 tsp vanilla
1/2 tsp cinnamon
1/4 tsp cloves
1/4 tsp nutmeg
small pinch of sea salt

Preheat your oven to 350 degrees.

In a bowl combine sugar, vanilla, eggs and whisk until smooth.

Add the pumpkin and continuing mixing until smooth.

Add the milk, spices, sea salt and mix until smooth again.

In a separate bowl beat the egg whites until stiff (peaks will form and not fall). This will take a couple minutes with an electric beater, but if you are up for the challenge a good 4-5 minutes doing it the old fashion way.

Gentle fold the egg whites into the mixture above using a spatula. Add the egg whites slowly while turning the bowl after each fold. To fold, gently mix starting in the centre of the bowl, curve the spatula and bring it out the side of the bowl. Fold just enough to make the mixture even.

Pour the mixture into the waiting pie crust and place in centre of the oven for 45 minutes. Serve with freshly whipped cream!
Click Here to Read More..

Sunday, November 1, 2009

Pumpkin Carving

Carving the pumpkinsI am not sure whether or not carving a pumpkin belongs in a food blog, but since I enjoy it so much I thought I would include my carving from this year. The first pumpkin was supposed to be a construction man since my oldest was going to be a contruction man, but neither worked out quite as planned. I made a helmut for the pumpkin, but since it was the same size as the rest of the head it a appeared more like a ball cap.... oh well still looked good! It was quite a neat experience creating the family traditions with both boys heavily involved in the process.
A Happy Jack-o-LanternThe Monkey & Superman go trick or treatingConstruction Worker Jack-o-Lantern

Click Here to Read More..